Another Month; Another Post

It’s actually starting to feel like autumn is coming. My garden (such as it is) is winding down and I’ve been clearing beds and planting cover crops. This year I’m trying crimson clover in some of the beds as well as the usual fall rye/field pea/hairy vetch blend. Unfortunately the compost we put on one of the beds before planting the crimson clover had a ridiculous number of bronze fennel seeds still viable from last year’s plant! So now I have a crimson clover/fennel blend. We’ll see how that fares over winter and how easy it is to turn under in spring. The big compost bin was obviously not hot enough to break down the hard fennel seed and I’ve had it popping up everywhere in my veggie garden, including in the greenhouse with the tomatoes. I would have hoped that it would at least be helpful but it sadly didn’t prevent the flea beetles from having a field day in there this summer. Okay, I’ve learned my lesson the hard way. This year I got smart and chopped the tops off my one big fennel plant well before the seeds matured!

I guess I left you last with my broken foot not quite healed yet. To update, I got a good checkup at the foot clinic and finally got to see my x-rays where the bone is completely fused back together. Yay! I still occasionally have a little pain probably from stressed tendons but I’m up to 8 kilometre walks now so it’s improving. I haven’t given up my walking poles however. I like them a lot and will continue to use them for balance and exercise on my longer walks. Oh and you’ll be happy to know I found a new home for Harley the knee scooter, Francine the boot and the crutches (that I barely used awkwardly for 10 minutes)! I was contacted by an Instagram friend whose cousin was getting foot surgery. She lives only a few blocks from here so was able to pick them up easily. I didn’t ask her for any compensation because I was just happy to get them adopted by someone who could use them. (I didn’t turn down the bottle of nice wine though. Heh.) I didn’t want them back either because I don’t plan on falling down again any time soon! I hope she will pass them on yet again when she is finished with them. Their value when new totals about $500 and not everyone has that to spend especially after an injury. The equipment doesn’t usually get used for very long anyway and the wear and tear on them is minimal.

So what else is new? I still haven’t found out where my sewing and knitting desires are hiding. Not to mention the spinning and weaving ones which are completely MIA. I mentioned the tiny punch needle in my last post but haven’t really gotten much farther with that. I went bigger!

Hooked rug in progress

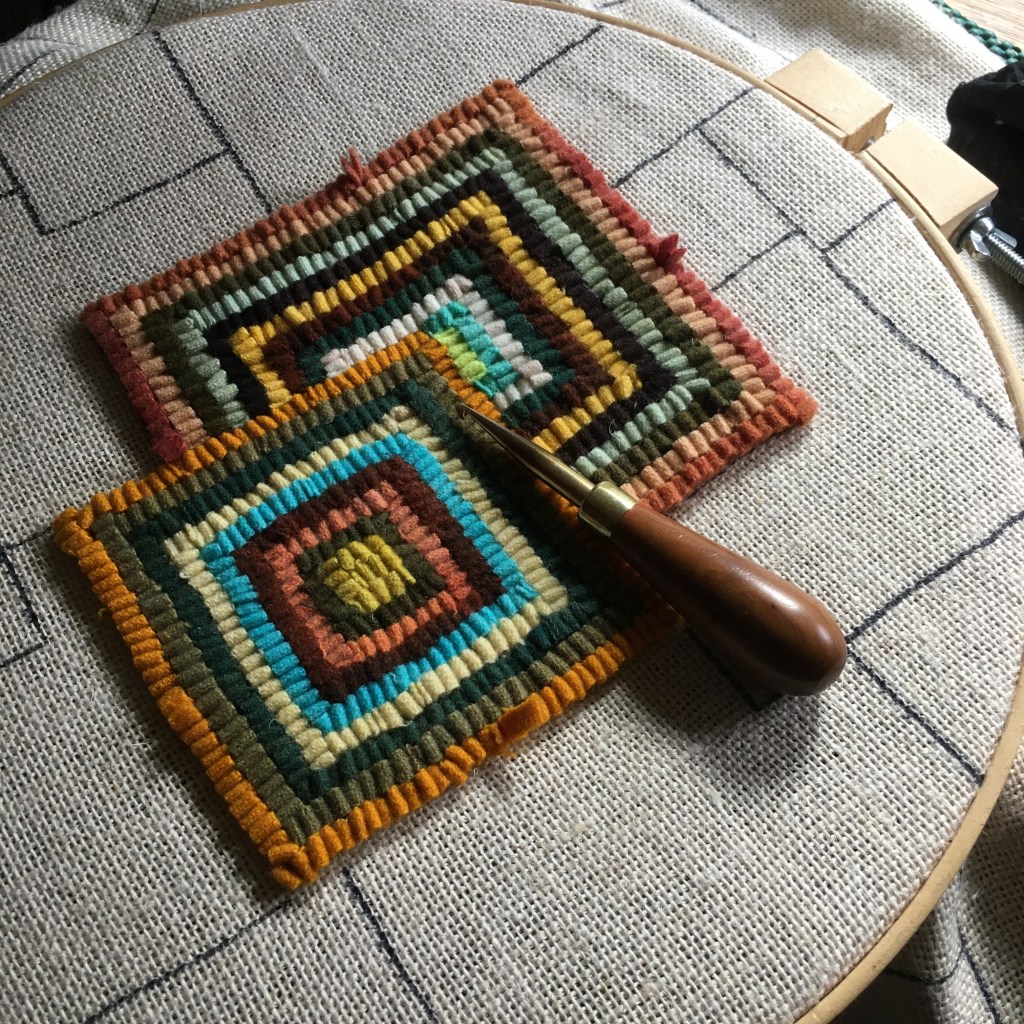
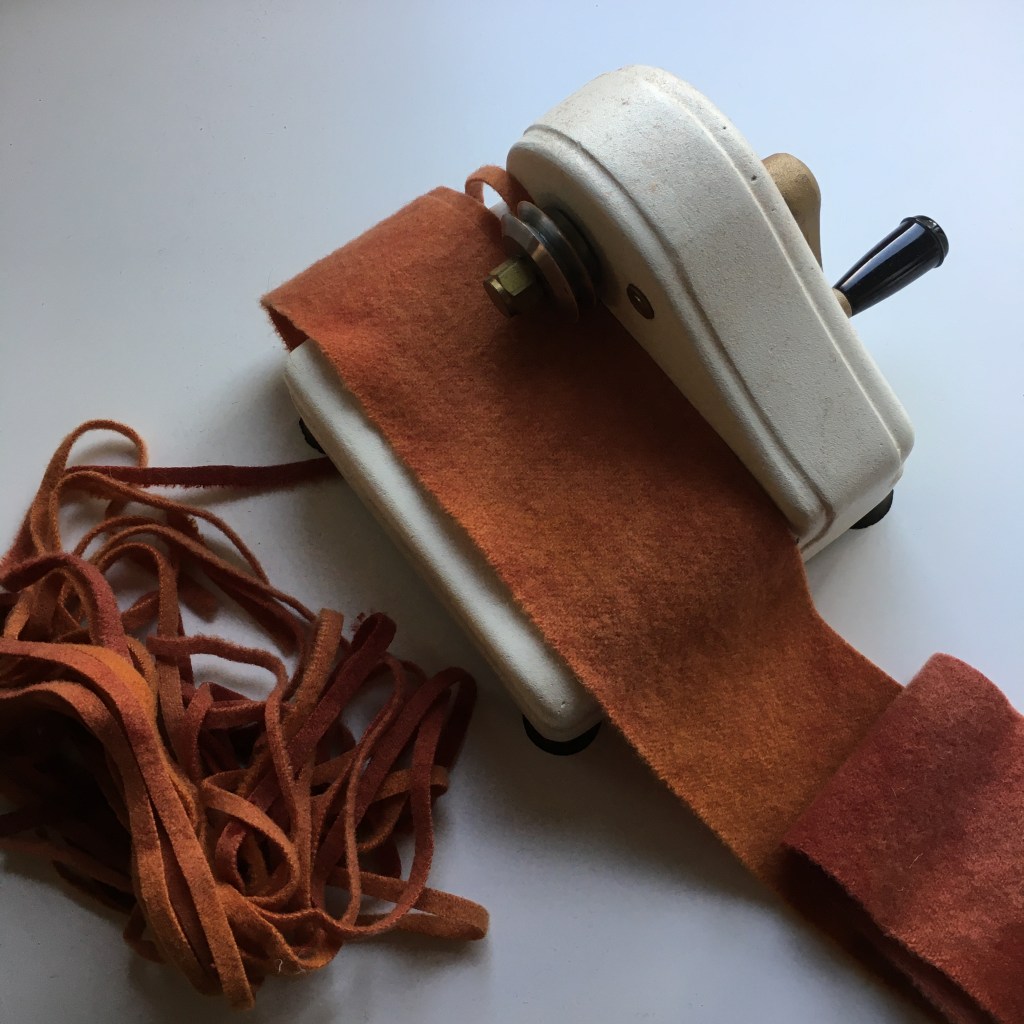
Yes, I dug out all my old rug hooking supplies including my big quilting hoop, cutter, wool flannels, hook and linen backing. I was really glad that Past Me was smart enough to hang on to all this stuff, probably knowing I’d want to do it again some day. The wee little Bliss cutter especially is now very difficult to find, at least in Canada, and a lot more expensive than it was 20 years ago. There are spiffy new cutter types out there but they cost over $1,000 and there’s no way I could justify that for a few rug experiments. I did splurge on two new cutter heads for Bliss though (from a very nice Etsy seller CaptainYarn in Quebec) so now I have a set of 5 sizes from #4 (1/8″) to #8 (1/4″). The latter is what I use most since I like the funky blocky effect of a wide cut. Also faster to hook!

Bliss Model A at work

I also bought another piece of gripper strip from Legacy Studio in Alberta (along with a few other tidbits to be discussed in a future post) and Thom finally made me a new hooking frame. It’s fantastic!

My new mahogany gripper frame

Gripper strips usually come in 40″ (approximately 1 metre) lengths and in two gauges, coarser for burlap and linen and finer for linen and cotton monks cloth. I went with fine and it holds my primitive linen well. The lighter coloured strip is the one I’ve had for years but realised it wasn’t long enough to make a frame as large as I wanted so the darker one is the new one, bought from the same source but probably a different manufacturer. The frame is 16″ x 12″ inside measurements and has a nice slope so I can see what I’m doing. I’ve been working on my cutting table but it also fits nicely on the TV tray table. I wish I had this type of frame years ago and maybe I wouldn’t have given up rug hooking for so long. It’s so much nicer to work on than the hoop!

Lamb’s Tongue border

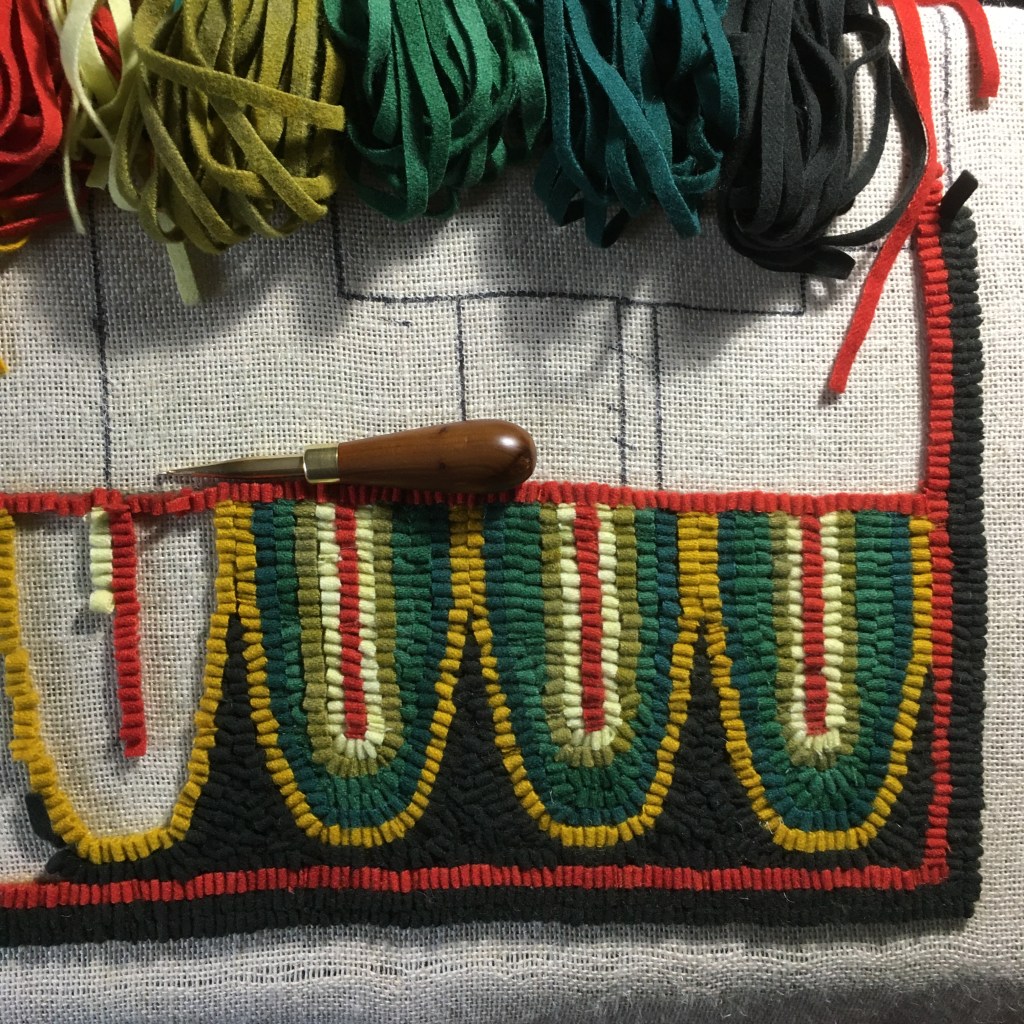
The design is from my own head (of course!) and consists of a centre section of overlapping scrappy squares with end borders of the shapes often called “lamb’s tongues”. I think the tongues were a popular fringe embellishment on penny rugs (appliqued felt rugs) that wandered over to primitive style hooked rugs. The name cracks me up! I always think of the way sheep stick out their tongues when they vocalize. (Yes, I speak Sheep. Can’t you hear me? LOL!!) Anyhow I thought the curved shapes would be a nice contrast to all the squares but ended up hooking the first tongue about 3 times before I was happy about the colours. My first effort was attractive but I realised that I didn’t have enough of that particular variegated wool to do both ends of the rug so back to the drawing board. Or the dye pots.

In my stash I had lots of remnants and already dyed pieces of the expensive 100% wool flannel that makes great long-lasting rugs plus at least 5 yards of it in its natural undyed state. So I went to town making some new colours to go with the old ones.

Dyed wool flannel

It takes a lot of wool strips to make a rug! I needed a few lighter values which I find hard to do since I always seem to add more dye than necessary. I was using up some of my old acid dye stock from the cupboard as well as some newer acid dye powders. Wool is the easiest fibre to dye in my opinion. Even old dead Procion MX dyes which are used for cellulose fibres like cotton, rayon and linen can be used with acid (vinegar, acetic acid or citric acid crystals) to dye wool. I experimented with some vintage (possibly upwards of 40 years old!) acid dyes that had been lurking in my cupboard just to see if they still worked okay.

Acid dyes on plaid wool fabric

As you can see (L-R) gold, red, magenta, violet, blue and black all still dyed the wool just fine. Unfortunately this fabric is too lightweight to use in my rug but it was good to know that the dyes are still viable. Who knew? I was reluctant to use them before not knowing if they would wash right out but now I’m more sure of their efficacy. I have had issues with occasional dyes in the past especially ones that were donated to me from who-knows-what source.

So now that I have a design for my rug and a proper frame to work on I’m going great guns on it!

Border number two in progress

You can just get a peek at the finished first border and now I’m working on the other end. I want to finish these up so that I can make sure I have enough of each colour and also bring any remnants of them into the centre squares, particularly the red. And while I’m hooking away I’m pondering design ideas for a second rug. They will both be for the bedroom to replace my handspun hand-dyed handwoven rugs that are wearing out so badly that I can’t stand to look at them anymore. The wool is fine but the linen fringes wore right off and the wool slid out of shape when it didn’t have any linen border to hold it back. I know I didn’t beat the weft in nearly hard enough either but I’m not happy with fringes that always wear out first! Boo. Obviously hooked rugs are durable because the one in the living room is still going strong after nearly as long (completed in 2002) and it’s only on Scottish burlap which is not recommended as long-wearing. The current one is for Thom’s side of the bed so is slightly narrower than the one that will be at the foot of our bed. On my side I already have an old latch-hook rug we made eons ago which is still in good shape. Gee. So many ways to make a rug! I’ll have to do a post on them all one day. Promise.

In other news, we had our 14-year-old grandson, aka The Man-Child, here for a week. It was lovely to reconnect with him after having not seen him in person for over a year and a half! He’s grown so tall and the voice has gone down to a much lower register. Also very long hair! He’s still a sweet goof but he was game to try different foods (roasted ratatouille, peach/cherry/strawberry clafoutis, naan-za (pizza made with naan bread), gluten-free pancakes with strawberries and yogurt) and to come walking with us and to have lunch with Thom’s mom, his great-nana. Lots of conversations, both serious and silly. Lots of playing his ubiquitous video games and trying to teach a card game to his grandpa without much success. I always feel it’s wonderful to borrow a grandchild every now and then but I’m also happy when they go home again! Does that mean I’m old and set in my ways? Probably. Heh.

Advertisement

Beginner’s Mind

Well, so much for posting more often. I missed the entire month of July! It was kind of tedious actually so you didn’t miss much. Hot, dry, no sewing, a lot of reading digital books on my iPad from the library, hardly any social media participation at all. I did go for more x-rays on my foot and a visit with the foot specialist clinic. I saw 2 doctors, a physiotherapist and a pedorthist and I have to go back for more x-rays and the doc again later this week. It’s been nearly 6 weeks since The Misstep and it has cost me over $800 in equipment purchases including Francine the Boot, Harley the knee scooter (which I no longer need), heel lifts, a carbon fibre sole plate, rocker-soled running shoes and a pair of walking poles. The only items I didn’t have to pay for are the crutches which I couldn’t use anyway! At least here in British Columbia I don’t have to pay for the Emergency treatment, x-rays or the clinic appointments which are paid for by my provincial medical insurance. I guess things could be worse, huh?

Anyway, I do love my poles and I plan to use them even after my foot has healed. They give me a lot more stability on our uneven sidewalks and trails and also exercise more of my upper body. Here I am with them and wearing my Blundstone boots for the first time post-break, with the stiff plate inside to restrict my foot bending too much.

Finally got the Blunnies on!

I was so happy that I managed to walk all the way to the farmers market, a 3 kilometre round trip! I’ve also been walking some in my expensive running shoes but I usually need to rest my foot later in the day and am still sleeping with Francine. (Ugh. So much fun in the heat!) The Hoka shoes have really thick soles which, when worn on my good left foot, helps balance the height of The Boot so I don’t need any other compensation.

Hoka One One Bondi 7 in black, of course.

I’m not a huge fan of running shoes but these are reasonably acceptable. At least they don’t have ugly logos and white soles. I really hate white-soled shoes! They aren’t as comfortable on my princess feet as one might suppose however. Even though these are wide width, they pinch my baby toes a little but at the same time the heel counter is too loose. I ended up tying a heel lock with the laces (also called a runner’s tie or lock lacing) which helps. My foot still hurts somewhat on and off so I’m being careful while still exercising it and yet trying to get back a little closer to normal function. I’ll find out where we’re at when I see the doctor again on Friday.

So enough about the foot! What else can I tell you? Oh yeah, Beginner Mind. I’ve been trying to learn how to do punch needle embroidery. In all my years of playing with thread/yarn/string doing every craft technique I could get my hands on, I’ve never tried punch needle. Probably because I didn’t want to make twee little pictures that hang on the wall! However recently I saw a few examples that seemed more attractive to me, perhaps to make a pillow or bag or something similar. I didn’t want to pay a huge amount of money for a punch needle tool just in case I didn’t like it, but I also didn’t want a really cheap one that would be frustrating to use. So I compromised with a medium-priced Rico Designs adjustable needle from my local shop, Maiwa Handprints. I had to make a large enough order from them anyway that I could get free shipping since I can’t walk to the store yet to pick things up so I just added the needle in to that. I wasn’t about to buy anything else for this new craft so I just raided the stash for fabric, hoop and threads to try.

Hah! It’s harder than I expected! Even though the theory is really simple, just poke-poke-poke, there are details that aren’t immediately obvious. I watched a lot of YouTube videos. I modified my cheap embroidery hoop by wrapping bias tape around it so the fabric wouldn’t slip. The fabric was a scrap of linen-like mystery stuff with a fairly coarse weave but it’s just barely coarse enough to allow the largest needle tip to pierce it. I experimented with threads and tips. It’s finally getting a little easier and I’m making less “bloops”.

Needle punch embroidery with the good side up.

But you work from the back side of the cloth.

Working side up with all my wonky stitches!

It takes practice! Which is where the Beginner’s Mind comes in. You can see where I started with loops way too far apart and very wobbly. Closer together looks much better and each different combination of thread type and needle tip size needs different spacing too. I learned to make my outlines really close so they show up better. Every time you change a colour or run out of thread you have to use a long wire threader to re-thread the needle. I also played with loop heights for different effects. It’s like a really teensy hooked rug!

Speaking of which, rug hooking is something I have done in the past and I really enjoy and we definitely use the few rugs I’ve made. There is a larger version of punch needle where you can use a much bigger tool and bulky yarns or wool strips to make rugs that look very similar to rug hooking. The difference is that instead of pulling up loops with a hook from the front, you’re poking them in from back of the cloth. Again you need a frame or hoop to hold the fabric taut while you work. Thom and I have been going to make a proper frame with gripper strips for years but it never happened. Yet. I even have a 40″ length of gripper strip which turned out not to be enough for what I wanted. I may be ready now to buy another length and get to it. I have all the other equipment and I need a new rug or two for our bedroom (and I don’t want to weave them) so why not? Maybe working teensy has inspired me to re-assess my options? We’ll see.

Meanwhile I just plan to play some more with my wee practice piece, leaving most of the mistakes in so I can see any progress I make in technique. Incidentally it’s really easy (almost too easy!) to frog punch needle. Just pull the thread out. Zzziiipppp… Scrape over the holes in the cloth with your fingernail or the tip of the needle and go again. Surprisingly I haven’t been tempted to buy any books on punch needle embroidery. I’ve made do with online info and experimenting on my own. I would always want to use my own designs anyway. It’s not hard to draw on the back of the fabric with a pencil. And then it’s just a matter of colouring it in with loops. I do like the look of pile areas with plain fabric areas showing as well so I might try a project using that.

“In the beginner’s mind there are many possibilities, but in the expert’s there are few.”

Fashion Sketching (And Other Amusements)

Are you surprised? Another post so soon after the last one! What is that old damselfly up to? Well, just for starters the unbelievable high heat broke finally so I don’t feel like I’m imminently going to melt into a pile of goo! The brains work again even if the body, at least the foot, doesn’t. Things are looking up! And I have plenty of time on my hands right now. Heh.

Last post I started to (badly) show the sketch of an idea for a jumpsuit that I was thinking about making. I used a printout of my personal fashion template that I recently purchased from My Body Model an app that uses your own measurements to create a shape that more closely resembles the real you. What I especially like about it is that you can mess with the results until you are completely happy with it before you fork out any money! When you pay (there’s a system of “credits”) you have the choice of a basic PDF package of page layouts or one with more options. I just got the basic one and it works fine for the kinds of things I want to do. You also get a plain PDF file that you can use in a drawing program if you want. I prefer an excuse to buy more brush pens! Just to show you how accurate the My Body Model croquis is, here’s a comparison of my sketch from 4 years ago made from a photograph and my personal MBM template.

The Real Me!

MBM’s feet are a little small (and I don’t have big feet!) and the hips look a little wider because the hip measurement is distributed around the whole shape rather than just in front where I carry my weight. Otherwise it looks pretty close particularly when I draw hair and glasses on her. It definitely looks better than the usual fashion croquis that makes a body ridiculously out of proportion to reality. Nobody is actually 9 heads tall, are they? If you don’t feel like you’re very good at drawing there’s lots of tutorials (both free and paid) available to learn some easy ways to put clothes on your template. I had great fun designing a jumper dress based on a York Pinafore hack for a gathered skirt version.

Plaid York Jumper Sketch

And when I was finished sewing, I dressed up like the sketch.

The Real Plaid York Jumper
Back View

Looks pretty similar, doesn’t it? The fabric is a “100% unknown fibre“ brushed back twill in an asymmetrical plaid that’s been in my stash for eons. It’s actually quite nice feeling for a synthetic but a burn test wasn’t definitive. I’d have thought polyester but it didn’t melt away from the flame and wasn’t self-extinguishing. It seemed to react more like acrylic which I’ve only experienced as yarn. Weird. Anyway, I love the colours and I’m sure I would have used it up long ago except for the fact that it’s very lightweight and clingy. In order to foil the cling factor I decided to fully line it with some coordinating cotton/poly shirting that I had also in stash without a clue where it came from.

I used the burrito technique to line the bodice and then attached the skirts (main and lining) each to its own layer so there’s no seams visible inside. I also added in-seam pockets because…pockets. Skirt and lining were hemmed individually also and I’ve worn this a lot since I finished it. Obviously a successful make! Here’s an interior view of the bodice so you can see the topstitching and lining fabric. My new tag went nicely too don’t you think?

Interior Detail

So you can see how being able to sketch out your ideas can be very helpful in visualizing how they will look in reality. You can “try on” garments and change the proportions or plan outfits and capsule wardrobes easily before you commit actual fabric to the project. It also allows you to look at your own body with some detachment so your judgement isn’t as laden with so much personal baggage. It’s just paper dolls! And yes, if you’re like me and loved playing with paper dolls as a kid, you can make your own personal “paper you” all ready for your wardrobes of fabulous clothes. Anyway I’m sold. I have more My Body Models to show you but right now I’ll just leave you with this Hipstamatic photo of my backyard. I got a new “lens” and “film” pack: Moab. Couldn’t resist since I’ve actually been there! I should remember to play with this app more often now that I have a better camera in Thom’s old iPhone, huh? It’s nearly impossible to take a bad shot. So artsy.

The Misstep

Well, I bet you thought I’d disappeared completely! I seem to be barely keeping up with one post per month these days. This time I have a couple of reasonable excuses. First is an excess of gardening: at least 2 hours or so on most days. The veggie garden was producing beautifully and the flowers and dye plants were looking really nice (except the Japanese indigo, but that’s another story). Then two forms of disaster struck at the same time.

A week ago now we were out for a walk in the lovely warm sunshine and I happened to look up at some road work that was going on the other side of the street and…stepped partly off the sidewalk into a low area of dirt, flung myself to the other side to try to keep my balance and went down. At first I just thought I’d given myself a nice new road rash on my leg. Wouldn’t be the first time! I assured the concerned women directing traffic around the equipment that I was okay. Mopped up the blood with a hankie and popped some bandaids (which I carry in my pack) on the worst of the scrapes and carried on. Limping. Pain in my twisted foot but not too bad. Yet. Walked to the bakery, walked home, did laundry, made the bed and the pain was increasing along with the bruising. Raised my foot, applied ice but not sure about whether it was just sore from the edge of my sandal or what. Decided to wait because by that point the emergency department in my favourite little hospital close to home was closed by that point.

Of course you know the story already – it just got worse overnight and by morning I couldn’t put any weight on my right foot at all! Off to hospital right after they opened at 8am. Gotta say, getting into the car was not fun. At the hospital there at least was a wheelchair! I was happy to see they were very cautious about Covid-19 protocols and even gave me a new medical-grade mask to wear. But they wouldn’t let Thom in so he waited outside. It took 3 hours in total but I got x-rayed and fitted for an air boot and crutches once they determined that yes, indeed, I broke my 5th metatarsal. Average 8 weeks non-weight-bearing healing. There goes my summer! Also broke (hah!) my 70-year record of no broken bones. Sheesh.

The Boot (aka Francine)

Unfortunately it turns out that I’m pretty much incapable of using crutches easily or safely. Not enough upper body strength especially in my hands and wrists and wobbly balance means I needed a spotter whenever I so much as tried to go to the bathroom! And I never felt secure at all. Not ideal. So several Instagram friends suggested a knee scooter which I had never even heard of before. Several months rental (if they even had one available) was more expensive than buying one brand new but Thom did some searching on Craigslist and found a used scooter nearby for half price. He immediately went out and got it for me.

Harley the Knee Rover

Meet my new Harley! Vroom-vroom! It’s heavy enough for me to feel very comfortable, has an effective disc brake that locks and a basket so I can carry stuff. Drawbacks are that the turning radius is very wide (I guess for stability) so I end up doing lots of backing and turning or else just balancing and lifting the back end around. The wheels are nice and quiet but apparently only work well on smooth hard surfaces. Thom ran around and removed all our small area rugs to clear the runway for me. The house isn’t very big but at least the rooms and hallway aren’t too small. Except the bathroom where I have to back in! I am so grateful that we put in a couple of grab bars and got a shower seat last year. Thinking ahead.

So I bet you’re wondering what the second disaster might be? The weather! Back in the beginning of June we actually had a couple of very cool days, one of which even broke a record low for that date. Now however, we are expiring under a “heat dome”! Several days of record-busting highs and no air conditioning in our house. Ugh. Poor Thom can’t keep up with the garden watering and I can’t help. Currently at 5pm it’s 37C/98.6F (aka body temperature) outside and 30C/86F in the house on the main floor. Hottest I’ve ever seen it in the 42 years I’ve lived here! Since I can’t navigate stairs, I have no idea how hot it is in my studio. Surface-of-the-sun hot, probably. Sort of glad it’s out of temptation because I really want to work on some sewing patterns.

This one for instance:

Jumpsuit Hack

Sorry about the sub-par photo. Gee, I haven’t blogged about the croquis from My Body Model yet, have I? Coming soon. It’s fun sketching ideas. I mean, what else do I have to amuse myself with these days?