Is It Just Me?

Or are too many people acting particularly stupid these days? I really don’t understand how you can ignore the practical, logical, sane, proven and functional and instead favour lies, magical thinking and complete bullshit. And although recently it seems like an American problem, there’s tentacles creeping into Canada here and I’m sure other countries as well. I don’t want anything to do with all that insanity. Not to mention stray viruses. I’m perfectly happy to stay home in my creative space and far away from the madding crowd. And may good sense finally prevail! That’s not more magical thinking, is it?

Moving right along. Once I got Janny, the Janome HD5000, back from the shop it suddenly got awfully crowded in my sewing space. With four machines now instead of two, I needed a different setup. I found the desk I wanted from IKEA (Linnmon/Alex) but of course thanks to everybody working from home, they were out of stock. So I waited and waited and finally was able to order it online and pick it up no-contact. And yes, it came completely unassembled so out came the hammer and screwdriver. The power drill with screwdriver bit was especially helpful because there were so many fricking screws!

Alex assembling

Is it just me who finds this challenge rather satisfying? Like giant tinkertoys! Got her done eventually and it just fits in the available space.

Complete!

The tabletop just sits on bumpers on the top of the drawer unit so it was easy to move the latter a little closer to the centre so I can access the electrical outlet on the left. It’s an inch taller than my older sewing table but not really an issue. Covyn, the Janome coverstitch machine just cosies up nicely next to the lip. I also had another go at reorganising my drawers too now that I have five more of them. It was a little tricky plugging everything in however especially since I wanted the Brother to have a surge protector for the electronics. (All the other machines are mechanical and not quite so vulnerable.) And in our old and inadequately wired house there’s only one outlet that everything can go into so I had to get a new power bar. But they’re all happy now.

The Lineup

Everybody has enough elbow room and I can scooch along them on my wheelie stool. Kinda fun! So what have I been making?

I think I missed a few items, such as the two pairs of pants I made for Thom.

WBM Men’s Chinos

This was a kind of Battle of the Chinos except that nobody really won! I made the first pair back in September, the brilliantly named Men’s Chino Pants from Wardrobe By Me, and managed to forget to blog them. The fabric is the same stretch denim in a faded black as my Popped Collar Vest that I did manage to blog about. (And that I’m currently wearing BTW!) The wee hint of stretch, recommended in the pattern, made these very comfortable with the result that he wears them often. I like the single welt back pockets and back darts instead of a back yoke.

See the source image
Chino Pants line drawing
Single Welt Pocket

I did not like the directions for the fly even after watching the video tutorial 3 times! Somehow, the results are dependent on the zipper tape width which doesn’t really work well since my zips seem to be wider than hers. I had the same issue with the WBM Cargo Shorts as well. Obviously I need to figure out a better way to sew this part. Also the front pocket bags didn’t line up with the fly the way it looked as if it should in the instructions. Ditto with the Cargo Shorts pockets not working out properly though I’ve since received updated pocket patterns for those from the company. Haven’t tested them yet. But I digress.

Thread Theory Jedediah Pants

The second pattern is Thread Theory’s Jedediah Pants, also a slim-fitting chino trouser. These ones have a yoke back and jeans-style patch pockets.

See the source image
Jedediah line drawing
Jedediah back

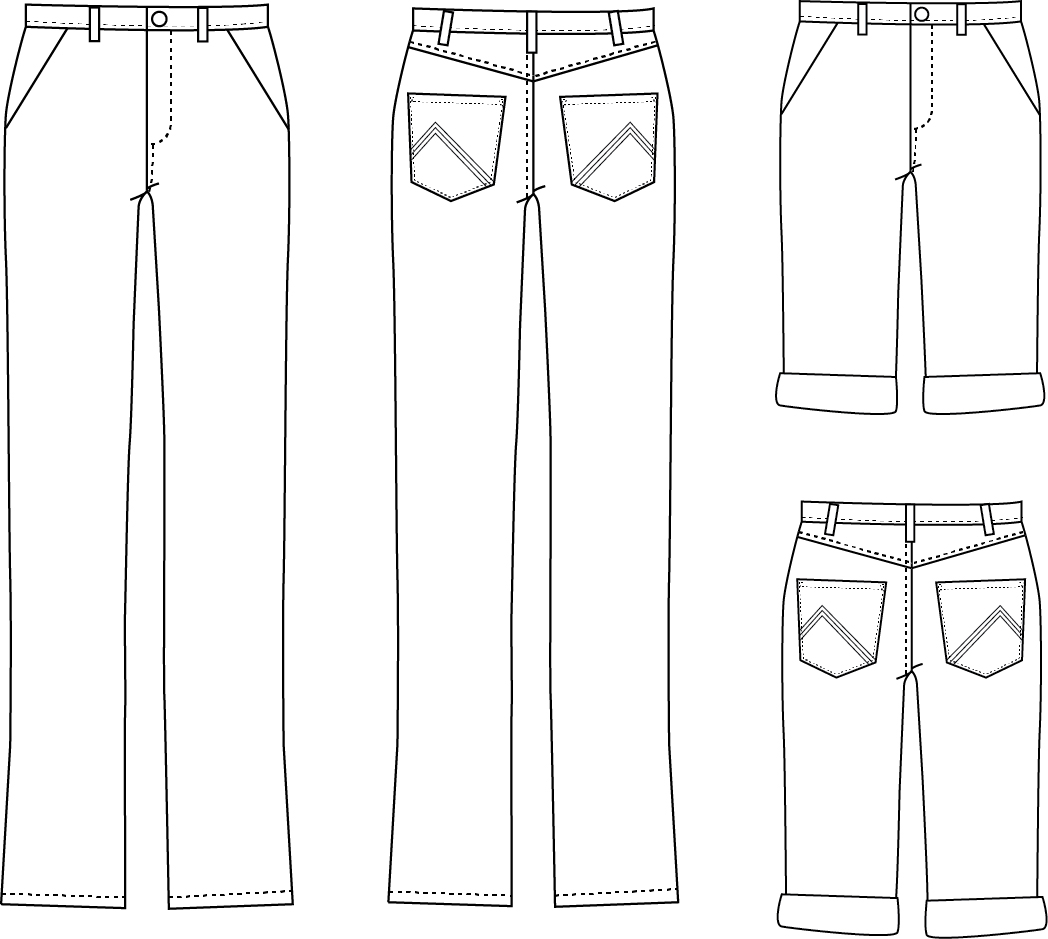
I had a great time drawing up my own T design for the back pockets.

T-Pockets

The fly instructions were nearly as impenetrable as the WBM Chinos but there’s also a video tutorial featuring a very nervous but adorable Morgan! The results seemed to go easier. Which was a good thing since the fabric that I used for these pants is totally weird. I thought at first it was a denim because it’s olive green on the right side and sand on the reverse. However it turns out that the green is some kind of coating that acts a little like wax canvas in that it develops a patina which you can see in the closeup. It machine washed and dried just fine however and the rather stiff hand didn’t change. It was difficult to stitch through and unpicking is impossible because every needle hole is permanent. Slight bits of the sand colour show through the seam edges. Notice how I’m not showing the insides! I couldn’t have sewn this without my heavy-duty Janome machine. I had to use a hammer to flatten the thickest sections of the waistband and belt loops but they sewed through okay. The buttonhole turned out pretty bad though when the buttonhole foot slipped and I had to pick it out twice. The swatch version was near perfect. Go figure. I used lots of fray check on it and hopefully it will hold up totally hidden under the button and the belt buckle!

Thom finds the Jeds just a smidgen tight at the waist even though it’s the same finished size as the WBM Chinos but that’s because of two things: some winter weight gain and the absolutely zero “give” that this coated fabric has. I have no idea how well it will wear or whether the seams will hold up over time. In a more forgiving fabric I would have let out the side seams and lengthened the waistband just a little but that’s not happening. Sometimes you just can’t tell the true fit until it’s all finished. He says they will be worn anyhow and maybe they’ll relax a wee bit. But for a wearable muslin they are just fine.

The true test will come when I go to make the next pair! Then I’ll leave it up to Thom to break the tie. They are similar but different. Both take nearly the same amounts of fabric. Neither one is really any more difficult to make (ahem…depending on sensible fabric choice). Which pattern will he choose?

Kalle Take Two

I wasn’t especially happy with the fit of my first Closet Core Kalle, the cropped version that I showed in the last post. I decided more work was necessary at the shoulders as well as going up one size in the upper chest area front and back for just a wee bit more wiggle room. It was quite an involved process since I was combining several adjustments at the same time: sloped shoulder, forward shoulder and high round back. All this changed the shape of the back yoke quite a lot and also took a large wedge out of the front shoulder seam. I took a little more from the back armhole by nibbling another wedge out of the back bodice at the armhole edge. In order to counteract some of the narrowing that all this caused on the sleeve, I lowered the underarm where it curves from the sleeve into the body of the garment. All this in turn necessitated remeasuring the cuff pieces. I had to add to the back cuff and take a little bit away from the front one. Whew! In the end though, the fit is a whole lot better.

Kalle Dress Version
Kalle Dress Back

This time I decided to make the dress version of the pattern with the pop-over button placket, collar and inverted pleat. I used the narrower band collar piece for the collar stand and shaved 3/8″ off the collar to match because I thought the original collar was a bit too oversized. I also added 2 pockets instead of one because otherwise this dress has no pockets. Should have put inseam pockets in, shouldn’t I? Next time for sure. The fabric is a narrow handwoven, tie-dyed and batiked cotton from deepest stash. Must have been lurking there for at least 25 years! Bright and cheerful enough for you? Even though the patterning is completely funky and there was no matching anything anyhow, the fabric was quite lovely to work with and pressed and sewed like a champ. The buttons were little turquoise plastic ones salvaged off something ages ago and they matched very nicely.

The fit on this second Kalle is very much improved! As well as the shoulder changes, it grades from a size 12 at the neck to a 14 at the bust, 16 at the waist and 18 at the hip. Four sizes is quite a large range, eh? Also this is the dress pattern as drafted for 5’6″ and I’m only 5’3-1/2″ and it’s still quite short, although I suspect some of the extreme hi-lo hem curve has been removed since the pattern photos. Anyhow, all my adjustments worked like a dream even though they had me scratching my head whether or not I did it all correctly. Yay! Now I have another good pattern to add to my collection. I may succumb to a tunic version yet! I wouldn’t mind experimenting with long sleeves as well but don’t think I’ll be buying the expansion pack that Closet Core has available. A simple sleeve, tower placket and cuff shouldn’t be hard to draft myself and save the cost (which comes to over $9 CAD) to put towards something else. I’d still have to adjust the upper edge for my revised sleeve opening and shorten the length as usual for my T-rex arms anyway plus I already have a tower placket pattern so why not DIY?

So then there were about 2 yards left of the fabric so I decided to make another wearable muslin, this time for Thom. I tried out the Wardrobe By Me Tropical Shirt. The only fit adjustment that I made was to straighten out the waist curve because he’s pretty much the same measurement at chest, waist and hip. (Unlike me!) I did debate with Christina from WBM about her pattern sizing for men which I have found rather confusing but haven’t really gotten a satisfactory answer apart from “European sizing is different” and “Euro men are smaller”. Uh-huh. Thom’s 40″ chest which is a size M practically everywhere else is an XL in WBM sizing. The largest size offered, 3XL, is only a 45″ chest which seems a rather limited range to me, at least on the top end, whatever you label it. Anyway the finished measurements were what he expected so that’s what I made. And was just able to squeeze it out of the remnant piece.

Tropical Shirt
Tropical Shirt Back

There was no way to choose where the patterns ended up since there was so little fabric to work with. My friend Melanie says he has owl eyes! Hah. Now you can’t unsee that, can you? Instead of the pocket pattern I used a spare one that I’d cut out for the Kalle and decided that it wasn’t looking right there. It works fine here. There’s only tiny fabric scraps left, which is what you want, right? Thom is quite happy with his new shirt and it’s now dubbed the Aloha Shirt. He says he will wear it while holidaying in Las Livingroom and Puerta Backyarda! There will be more, especially as his collection of short-sleeved summer shirts start to wear out. Some are upwards of 15-20 years old now and the best ones are linen, ramie or a linen/cotton blend. He wears them all the time when it’s warmer, preferring them over t-shirts because not only are shirts cooler, he can keep his glasses in the pocket.

One change I might make to this pattern in future is to add to the 1cm (3/8″) seam allowances at the side-seams and the top of the sleeve so I can sew flat-fell seams instead of having to overlock them. So much nicer inside and more durable for shirts. I used flat-fells on my Kalle which was easy because it started with 5/8″ seam allowances. On the dress the seam finish was even flexible enough to accommodate the curve under the arm where the body morphs into the sleeve but I did have to clip a little into the seam allowances underneath the top of the folded layer before stitching it down to get it to lie flat.

So what’s next? I seem to be on a bit of a sewing roll! I suddenly decided to use my lac-dyed linen/rayon for a longer version of the Peppermint/In The Folds Button-Up Dress. More on this one soon. I’ve made a few changes to it since I made the first version (which does look suspiciously like a copy of the pattern photo). I wear it a lot but it’s short and I hate the facings. I hate ALL facings! They never cooperate and lie flat or stay put. Give me bias binding over facings any day. There will be bias. Okay, I’m done!

Next Project

Take good care, everyone! Wash your hands, stay 6 feet/2 metres apart and wear your damn mask! It’s the least we can do.

Without Further Ado

I’d like to present The Peacoat Project:

The man asked for a peacoat like Jimmy Perez on the murder mystery series “Shetland”. Neither of us had any idea how much work this was going to be! Nearly a month and about $200 worth of materials later, his dream became a reality. He gets his coat while it’s still cold enough to wear it and I get sore fingers and a whole lot of new appreciation for tailoring. My goodness it’s a lot of sewing! Of course it’s partially my own fault. I couldn’t just follow the instructions that came with Thread Theory’s Goldstream Peacoat pattern could I? No, I had to do it PROPERLY! Hah.

I’ve done coats and jackets before of course. Back in the day I didn’t realise that the interfacings were so important to the shaping of garments and help to give it body and firmness that you can’t get otherwise. I was always a little – or a lot – disappointed with my makes. But this time I decided to learn all the heavy-duty stuff, like hair-canvas, chest shield, sleeve heads, basting, taped roll-line, hand-made shoulder pads, steam shaping, hand-stitched buttonholes etc. This is Hard Tailoring, in both meanings of the term. Thom helped me pick out the really nice wool blend Melton cloth in a dark olive green and had a blast choosing the coordinating quilting cotton lining featuring a cabin in the woods, canoes and a whole lot of forest animals. Then there was all of the interfacings, threads and buttons too. Lots of parts to put together. Oh, and if you’re ever wondering – Melton cloth is woven and then fulled, brushed and sheared so it sort of looks like felt but has an underlying woven structure. Unlike felt which is just fibres interlocked together randomly. Melton does have a right and a wrong side. The public (right) side is slightly less fuzzy and you can just barely see the woven threads whereas the wrong side is more felted-looking. I don’t know if it’s critical but I cut the coat out with-nap, everything facing one way, just in case it showed in the finished garment. I don’t think that was necessary though.

It was kind of daunting, I’ll admit. I started off with a lot of “analysis paralysis” and dreamed of sewing all night long for a week! I did a lot of research in the two tailoring books I bought and also online photos, tutorials and videos. Once I settled on how I was going to proceed it went a lot better. Just concentrating on one part at a time. All of the hand-sewing was actually quite soothing and much easier than when I had to wrestle the beast under the sewing machine! It’s approximately one-third machine and two-thirds hand-stitched.

So now that it’s all over, I’d like to thank my cast and crew of this endeavour: Janny the sewing machine, Loopy the serger and of course Debbie Double my dressform without whom this would have been impossible. Even if the coat didn’t actually fit her shoulders very well she held up under the pressure! And speaking of pressure, Chi-Long the steam iron and the rest of the pressing tools did their important part too:

Iron, sleeve board, ham and clapper/point presser

And let us not forget the little things that made the sewing a whole lot easier:

Small but necessary sewing tools

Clockwise from the top-left. This project was the first one where I needed to use the small wonder clips when pins were just not adequate. My wrist pincushion now needs replacing with a better version (I stabbed myself right through it a few zillion times) and I need to sort my very fine pins which tended to get bent in the thick coat fabric. It was fun to use this vintage silk thread for basting. It just pulled right out when it was no longer needed and didn’t leave a mark if you ironed over it. My little Clover leather thimble is the first thimble I’ve ever had that I actually use properly. It’s comfortable on my middle finger, stays on (unlike metal ones) and I forget it’s there after awhile. Judging by the wear it also saved my fingertips! The wee box of Thread Heaven is a treasure since it’s not being made anymore. It has a different effect on thread (preventing tangles) than the wax (strengthening). All depends on where the thread needs to be used. And the water-soluble marking pencil holds up under ironing but disappears with a little dab of water. Turns out I like it (and it’s pink and blue siblings) better than other markers of which I have quite a few. I can tell because it keeps getting shorter. Not shown are the several different hand-sewing needles that I made copious use of daily.

Today I’ve been taking a much-needed sewing break in order to get all of my notes finished. I cleaned up the studio all ready for the next project. I already have 2 more warm pullovers cut out for Thom using the patterns I’ve done before, the North Star from Love Notions and the Finlayson from Thread Theory. Yes, I’m sewing for him again! He’s definitely sew-worthy! And not to worry, I’ll be back to selfish sewing and other things too before long.

You’ve seen this before but…now it’s finished!